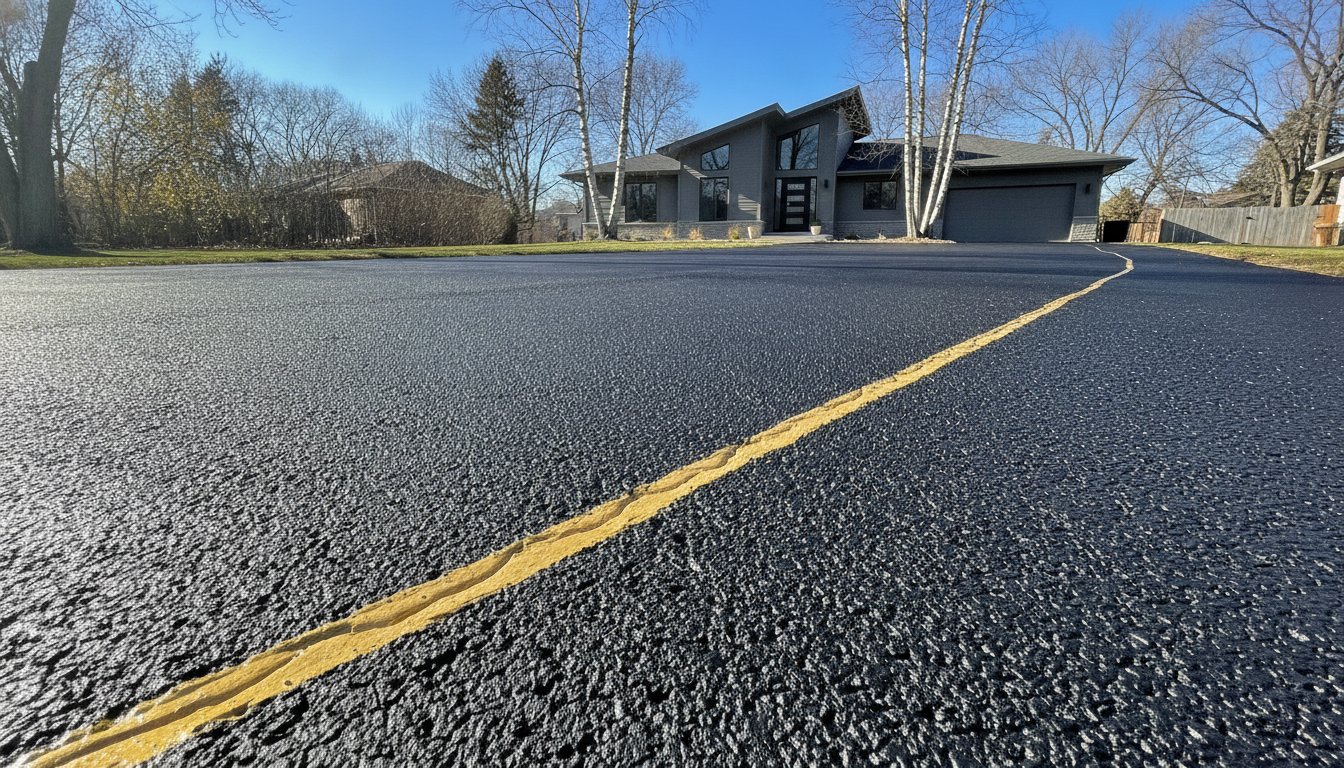
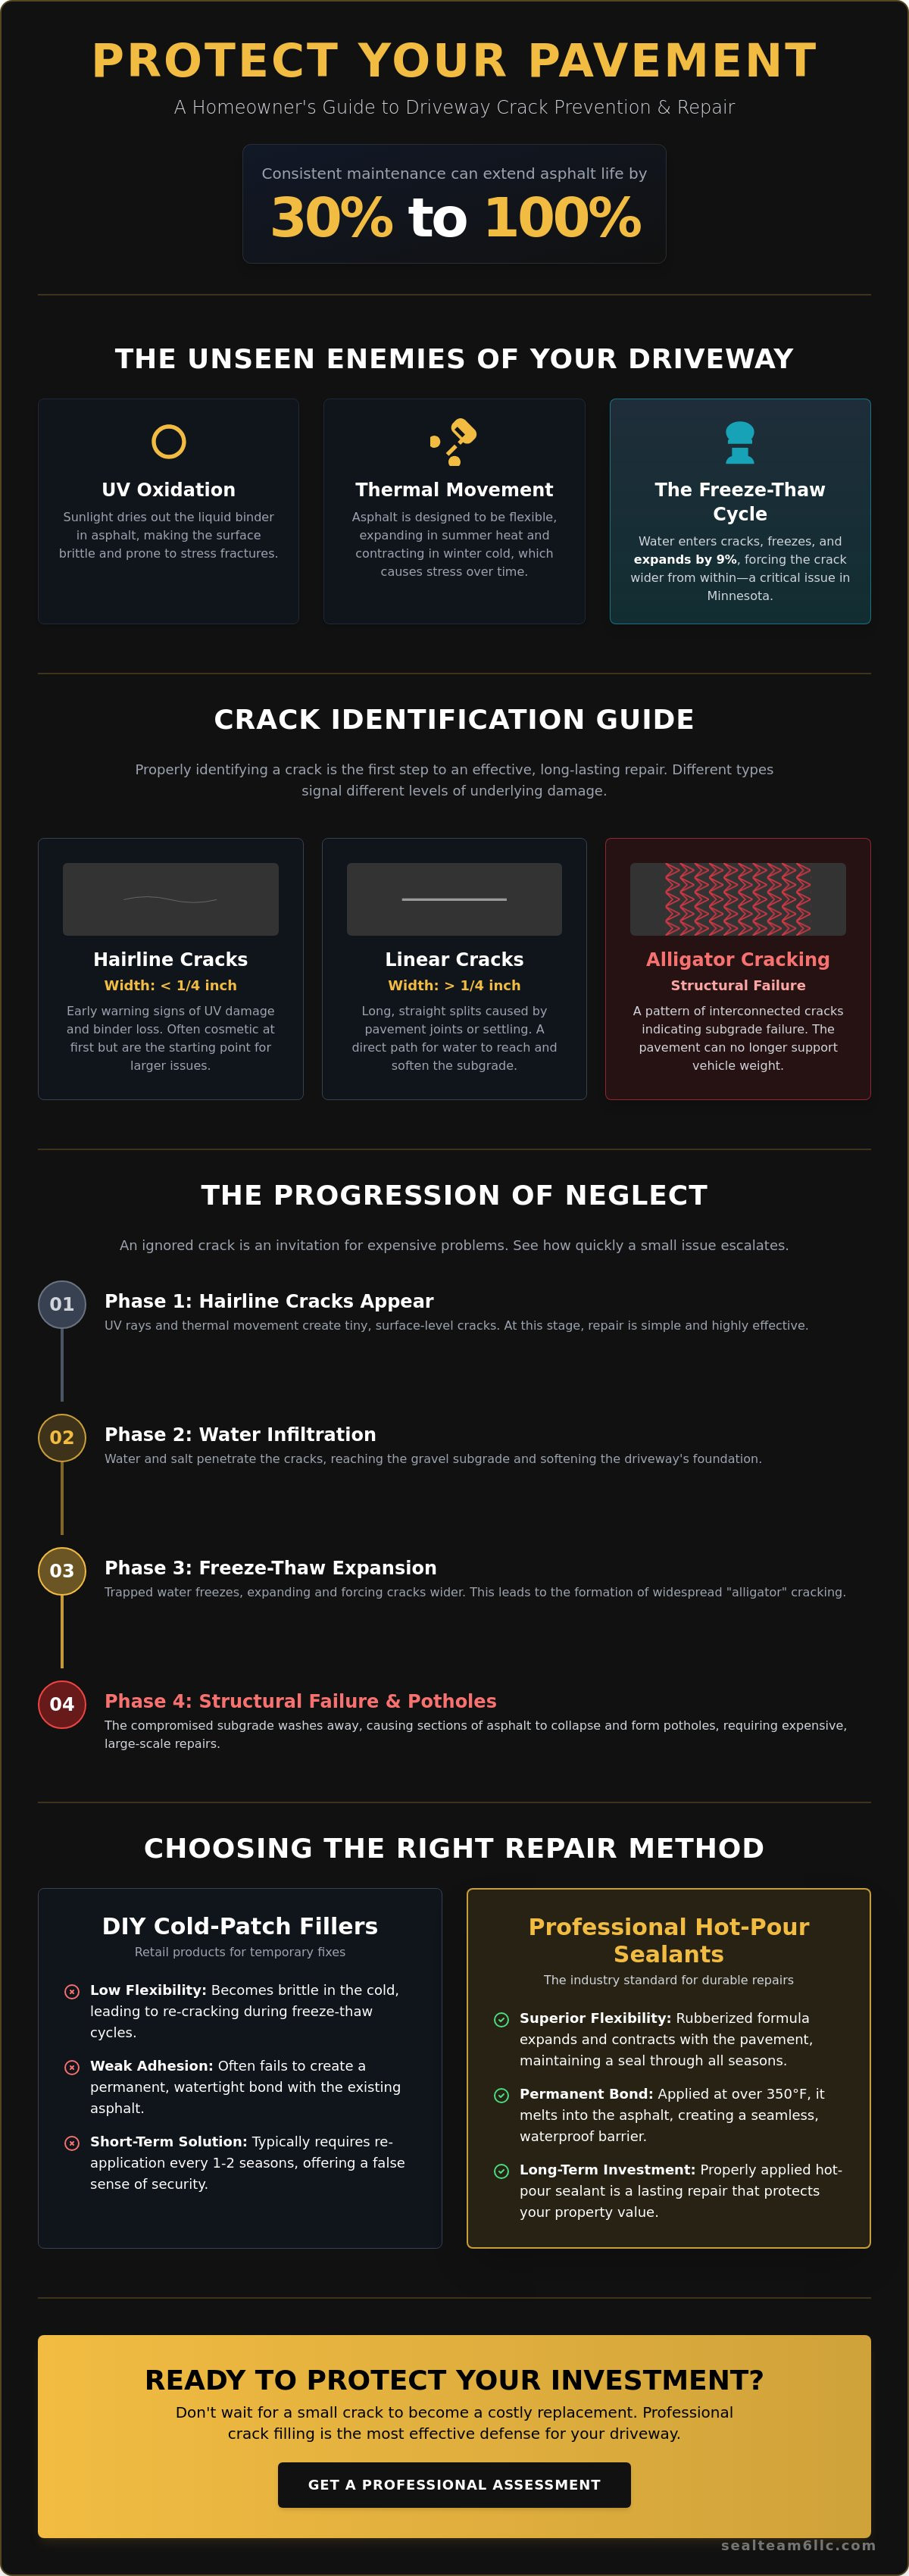
Did you know that consistent asphalt maintenance can extend the life of your driveway by 30% to 100% compared to letting it sit? Most Minnesota homeowners look at a small surface gap and assume they have time, but moisture and road salt are patient enemies. You're likely concerned about how quickly these minor flaws can turn into deep, expensive potholes. Learning the right way to fix driveway cracks is the most effective way to prevent structural damage before the next winter storm hits.
It's natural to feel overwhelmed by the rows of different fillers and sealants at the hardware store. This guide will provide you with the professional methods for identifying, preparing, and filling cracks to defend your property against our harsh local climate. We'll walk through the specific tools required for a lasting seal, the science of proper adhesion, and how to maintain a smooth surface that enhances your home's curb appeal for years to come.
Key Takeaways
- Understand how thermal expansion and UV oxidation cause asphalt degradation and why early intervention is essential for property stewardship.
- Learn to distinguish between cosmetic hairline fractures and structural splits to determine the most effective way to fix driveway cracks.
- Evaluate the performance differences between retail cold-patch products and professional hot-pour rubberized fillers for Minnesota’s freeze-thaw cycles.
- Follow a detailed preparation and application process to ensure your repairs bond correctly and prevent water infiltration.
- Discover how localized crack filling works alongside professional sealcoating to provide a comprehensive defense against environmental stressors.
Why Asphalt Cracks Happen and Why You Can’t Ignore Them
Asphalt is often misunderstood as a rigid, stone like surface. In reality, it is a complex mixture of aggregates and bitumen known as Asphalt concrete. This material is designed to be flexible, allowing it to expand during hot summer days and contract when the temperature drops. However, this inherent flexibility is also its greatest vulnerability. As the pavement ages, the liquid binder that holds the stones together begins to dry out due to UV oxidation from the sun. This process makes the surface brittle, eventually leading to the first visible signs of stress: small cracks.
Once a crack appears, it's no longer just a cosmetic blemish. It becomes a direct conduit for water to bypass the protective surface layer. When moisture reaches the underlying gravel subgrade, it softens the foundation that supports the weight of your vehicles. If you don't take steps to fix driveway cracks early, the base will eventually shift, leading to depressions and total structural failure. Understanding the cause and effect of this degradation is the first step in proper property stewardship.
The Minnesota Freeze-Thaw Factor
In Minnesota, our climate presents a unique set of challenges that most national maintenance guides overlook. The most destructive force we face is the freeze-thaw cycle. When water enters a crack and the temperature drops, that water turns into ice and expands by approximately 9%. This physical expansion exerts immense pressure on the surrounding pavement, prying the crack wider from the inside out. This heaving effect can actually lift entire sections of the driveway. Additionally, road salt tracked in from the street can lower the freezing point of water. This causes more frequent melting and refreezing cycles within the crack, which accelerates the breakdown of the asphalt's internal structure.
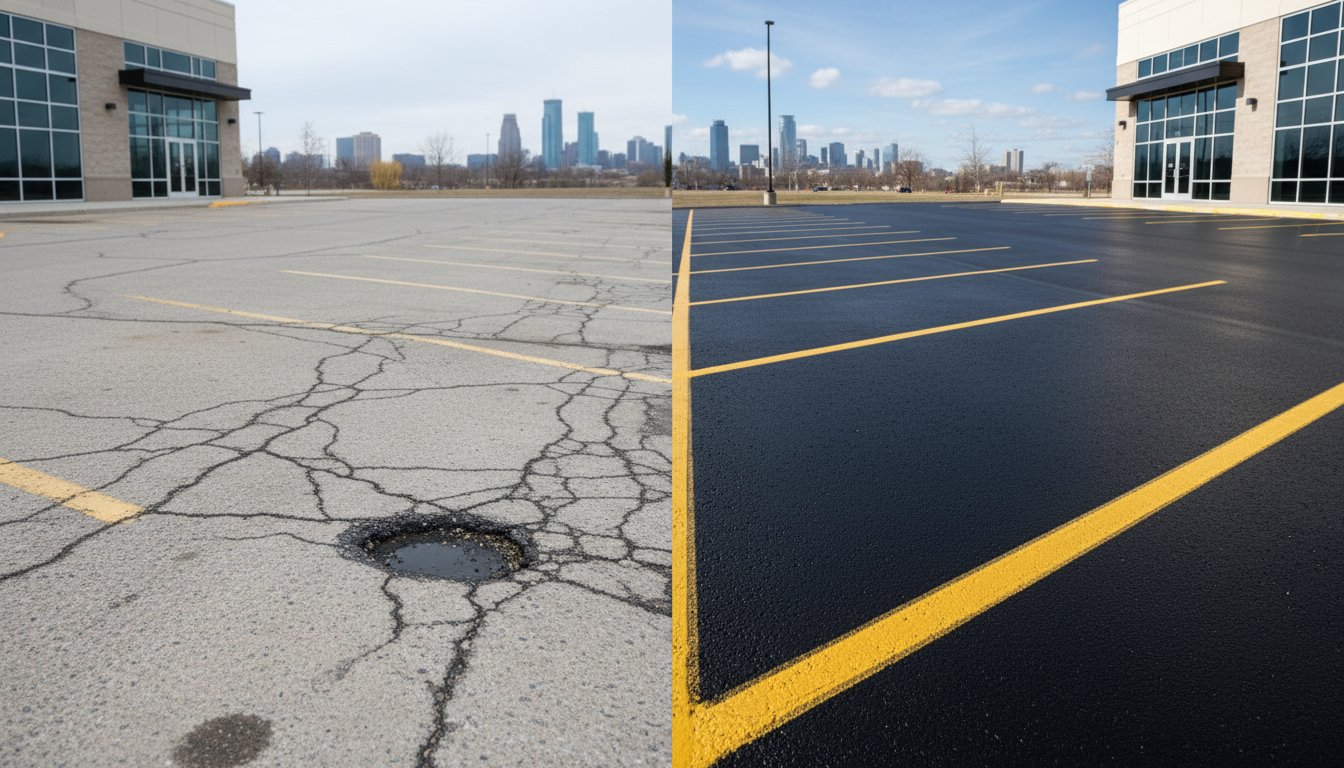
The High Cost of Delayed Maintenance
Ignoring a small crack is a gamble that rarely pays off for the homeowner. Within a single season, a minor split can evolve into a significant pothole as the compromised subgrade washes away. We view asphalt care as a form of essential defense for your property's largest exterior investment. Consider the following progression of neglect:
- Phase 1: Hairline cracks appear due to UV rays and thermal movement.
- Phase 2: Water enters the subgrade, softening the foundation.
- Phase 3: The freeze-thaw cycle expands the gaps and creates "alligator" cracking patterns.
- Phase 4: Potholes form, requiring expensive structural repairs rather than simple maintenance.
Choosing to fix driveway cracks while they are still small is a pragmatic decision. A simple crack filling procedure is a surgical, affordable solution that prevents the massive expense of a complete driveway replacement. By acting now, you are ensuring the long-term durability of your pavement and maintaining your home's curb appeal.
Identifying Different Types of Driveway Cracks
Not every gap in your pavement requires the same level of intervention. To effectively fix driveway cracks, you must first understand what the pavement is trying to tell you. According to the National Asphalt Pavement Association, proper pavement management starts with accurate distress identification. By categorizing the damage, you can determine if a DIY approach is sufficient or if you need professional grade materials to prevent further decay. Understanding these differences is a key part of property stewardship.
- Hairline Cracks: These are less than 1/4 inch wide. While they are often cosmetic at first, they are the early warning signs of UV oxidation and binder loss.
- Linear Cracks: These long, straight splits often run parallel to the driveway's edge or center. They usually occur due to thermal expansion or the natural settling of the pavement joints.
- Reflective Cracks: These occur when a new layer of asphalt is placed over an old, cracked one. The old cracks "reflect" through to the surface as the subgrade moves over time.
- Alligator Cracking: This is a series of interconnected cracks that look like reptile skin. This pattern is a red flag for structural failure, indicating that the subgrade can no longer support the weight of vehicles.
Diagnostic Checklist for Homeowners
You don't need specialized engineering tools to perform a basic assessment of your asphalt. A simple width check using a standard pencil is a reliable starting point; if the gap is wider than the pencil, it has moved beyond the hairline stage and requires immediate sealing. Next, perform a depth check. If you can see dirt or grass growing through the gap, the crack goes entirely through the slab. This provides a direct path for water to erode your foundation. If you notice pattern recognition like alligatoring, simple retail fillers won't solve the problem. The issue lies deep beneath the surface and requires a more comprehensive restoration strategy.
When a Crack is Actually a Sinkhole
Sometimes the most dangerous issues aren't cracks at all, but depressions. If you notice areas where the asphalt is sagging or pooling water, you might be dealing with subgrade erosion. This happens when water washes away the supporting soil, creating a hollow spot or a miniature sinkhole under your driveway. These areas represent significant safety risks and can lead to sudden collapse under the weight of a car. If you're unsure about the severity of a sagging area, it's wise to consult with a specialist in crack filling to determine if the base is still stable before you attempt to fix driveway cracks yourself. Proactive identification is the only way to defend your investment against long-term structural decay.
DIY vs. Professional Crack Filling: Choosing the Right Method
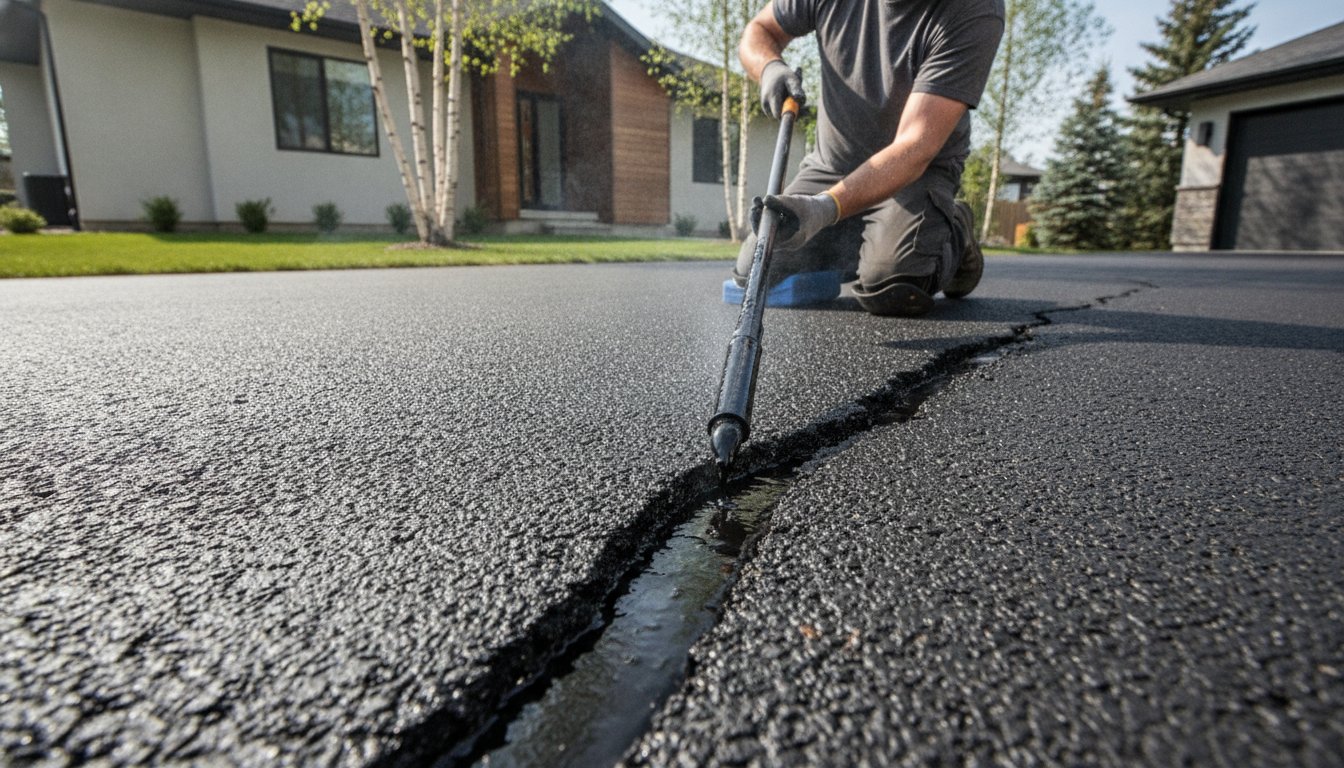
Homeowners often weigh the immediate cost of a DIY project against the long-term reliability of a professional application. Retail cold fillers, typically found in pourable jugs or caulk-style tubes, are accessible and inexpensive. However, these products often lack the chemical composition required to survive a single Minnesota winter. Because they are applied at ambient temperatures, they don't form a thermal bond with the existing asphalt. Instead, they act as a temporary plug that frequently shrinks or pulls away from the crack walls as the pavement contracts in the deep freeze. This leaves the subgrade exposed to moisture despite your hard work.
In contrast, professional grade hot-pour rubberized sealer is the standard for municipal roads and high-traffic commercial lots for a reason. This material is heated to approximately 400 degrees in a specialized melter before application. This extreme heat allows the rubber to slightly melt the edges of the asphalt crack, creating a fused, watertight seal. To fix driveway cracks effectively, you need a material that can stretch. While retail fillers become brittle in the cold, hot-pour rubber remains elastic. It accommodates the physical movement of the slab without losing its bond or rupturing during thermal shifts.
The Pros and Cons of DIY Repair
DIY repairs offer significant upfront labor savings and are a logical starting point for minor maintenance. If you have a few small hairline cracks, a high-quality retail filler might suffice for a season. However, the risk of improper application is high. Without professional-grade blowers or heat lances, it's nearly impossible to remove all deep-seated debris, vegetation, and moisture from a gap. If the crack isn't perfectly clean and bone-dry, even the best filler will fail to adhere. This often leads to a wasted afternoon and a driveway that remains vulnerable to the next storm. For many, the time spent on repeated DIY fixes eventually outweighs the cost of a professional solution.
Why Professionals Use Hot-Rubberized Sealer
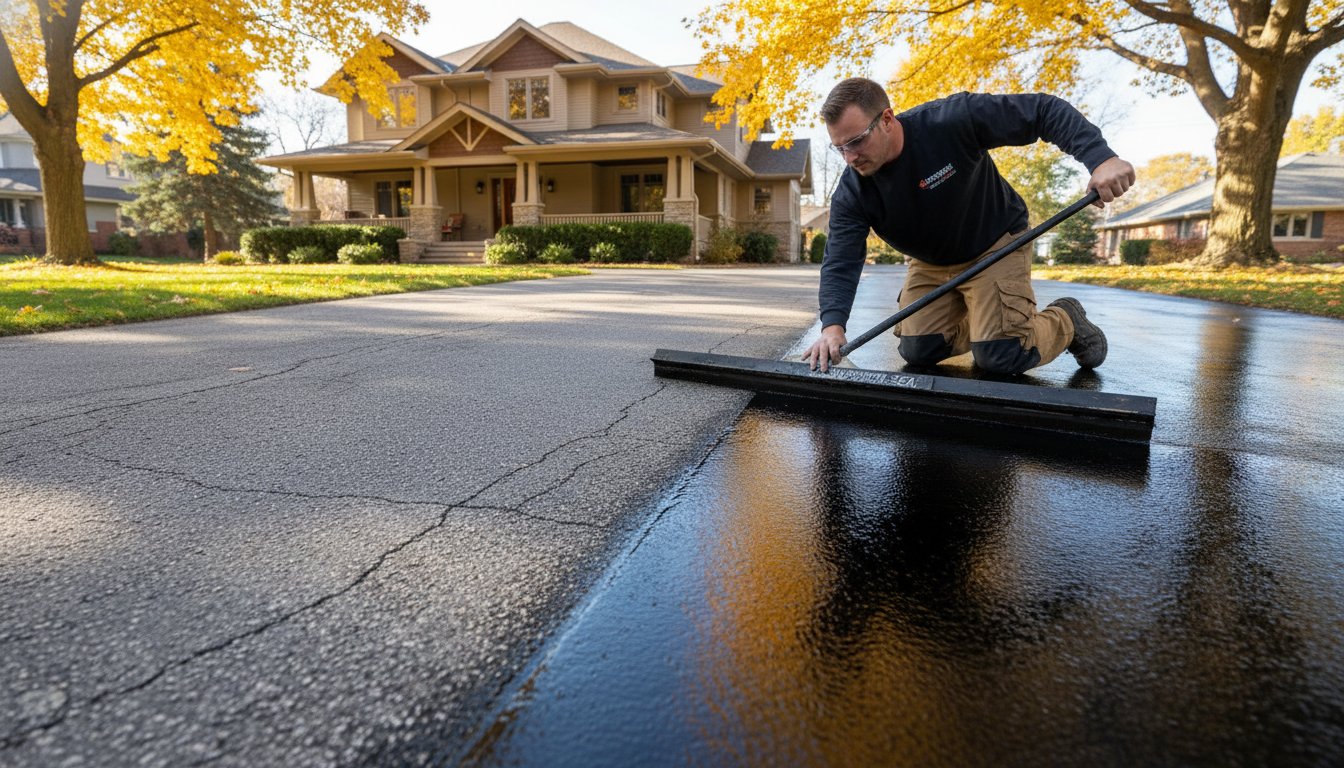
Specialists use equipment like heat lances and specialized pour pots to ensure a deep, consistent fill. A heat lance doesn't just dry the crack; it pre-heats the asphalt to promote better adhesion. This isn't just about speed; it's about the physics of the repair. The thermal bonding process ensures the sealer becomes part of the pavement's structure. This elasticity is vital for survival during the spring thaw. A professional application can often handle a large residential driveway in a single afternoon, providing a level of durability that DIY methods simply can't match. This proactive approach is the most sensible form of stewardship for your property's exterior investment, ensuring you don't have to fix driveway cracks again next year.
Step-by-Step Guide to Filling Small Driveway Cracks
Executing a repair correctly is just as vital as choosing the right material. If you've decided to fix driveway cracks yourself, you must follow a methodical process to ensure the patch actually holds. Most DIY failures don't happen because of the product; they happen because of shortcuts taken during the cleaning phase. A successful repair acts as a long-term defense for your pavement, while a rushed job will simply peel away during the first heavy rain or frost. Follow these steps to achieve a result that protects your asphalt foundation.
- Step 1: Deep cleaning. Use a stiff wire brush or a heavy-duty screwdriver to scrape out compressed dirt, rocks, and old, loose filler from the gap.
- Step 2: Removing vegetation. Pull any weeds by the root. If roots are stubborn, a small weed torch can be used to incinerate organic matter that might prevent the filler from bonding.
- Step 3: Drying the area. The crack must be bone-dry. Moisture is the most common cause of bond failure. If it has rained recently, you should wait at least 24 hours before proceeding.
- Step 4: Applying the material. Fill the gap from the bottom up, ensuring the material is slightly below the surface level to allow for natural expansion.
- Step 5: Curing. Give the material ample time to harden. Most retail products require 24 to 48 hours before they can handle vehicle traffic or a fresh layer of sealcoat.
Preparation: The Most Important Phase
You shouldn't underestimate the amount of debris that hides inside a narrow split. After you've scraped the area with a wire brush, use a leaf blower or high-pressure air to blast out fine dust. Some generic guides suggest using a garden hose to rinse out cracks, but this is a critical mistake for Minnesota asphalt. Introducing water into the gap creates a hidden reservoir of moisture that can take days to evaporate. If the pavement is even slightly damp, the filler won't adhere to the asphalt walls. For those who want a professional result without the manual labor, you can request expert crack filling to ensure the job is done with industrial-grade cleaning equipment.
Application Techniques for a Clean Finish
How you finish the surface determines both the durability and the look of the repair. The "flush-fill" method involves filling the crack exactly to the top, which looks clean but offers less room for the material to move. Many specialists prefer "over-banding," where a thin layer of sealer is spread roughly two inches wide across the top of the crack. This creates a "T-shaped" seal that prevents water from ever reaching the edges of the gap. To avoid "tracking"—which is when the sticky filler ends up on your shoes or car tires—you can lightly dust the wet sealer with fine sand. This simple step helps the patch blend into the surrounding texture while providing a non-stick surface as it cures. Taking the time to smooth the edges with a squeegee will help you fix driveway cracks in a way that looks intentional and professional.
Long-Term Prevention and Professional Asphalt Maintenance
Maintenance shouldn't be a reactive scramble; it's a planned act of stewardship for your home's exterior. While you may have learned how to fix driveway cracks to stop immediate water penetration, that's only half the battle. Think of crack filling as a localized bandage and sealcoating as a full-body shield. One stops the water from reaching the subgrade, while the other prevents the asphalt from becoming brittle enough to crack in the first place. By combining these two methods, you're addressing both the symptoms and the underlying causes of pavement decay.
In the Twin Cities, our asphalt faces extreme temperature swings that can exceed 100 degrees within a single year. This thermal stress makes a consistent maintenance schedule vital. For most Minneapolis and Saint Paul homeowners, we recommend a professional inspection every spring to identify any damage caused by the previous winter. You should plan to fix driveway cracks annually and apply a fresh sealcoat every two to three years. This proactive rhythm ensures your driveway remains elastic and resilient against the relentless Minnesota freeze-thaw cycles.
From Crack Filling to Sealcoating
You should never apply a sealcoat over an open crack. A common mistake is assuming that the thick liquid of a sealer will bridge the gap. In reality, sealcoat is a thin protective film designed to shield the surface from UV rays and automotive fluids; it won't stop water from entering a structural split. To learn more about this comprehensive process, you can read our Sealcoating Services in Minnesota: The Complete 2026 Property Owner’s Guide. When these two services are paired correctly, they create a synergistic defense that can extend the life of your asphalt by decades.
The Seal Team LLC Difference
We approach every project with the foresight of a local specialist who understands our unique regional challenges. We don't use generic, watered-down retail products. Our team utilizes professional-grade asphalt emulsion and industrial hot-pour rubberized fillers that are engineered for high-traffic durability. This isn't just about making the pavement look new; it's about restoring the chemical balance of the asphalt binder and defending your investment.
Our expertise in local soil conditions across the metro area allows us to provide recommendations based on science and experience. We take pride in being a partner in your home's long-term care. Requesting a free estimate is the first step toward a restored and protected driveway. We'll help you identify the best path forward and develop a custom maintenance plan that keeps your property safe and beautiful for years to come.
Protecting Your Property Investment
Maintaining your driveway is an essential act of stewardship that defends your property's foundation from the relentless Minnesota freeze-thaw cycle. By learning to distinguish between cosmetic surface wear and structural damage, you can address issues before they compromise the subgrade. Choosing to fix driveway cracks with high quality materials ensures that your pavement remains flexible and resilient through the coldest months of the year.
We focus on long-term restoration using professional hot-pour rubberized filler that bonds deeply with your existing asphalt. This proactive approach prevents the formation of potholes and extends the life of your driveway significantly. You don't have to manage these repairs alone. Protect your investment with a free crack filling estimate from Seal Team LLC. We offer free local estimates across the Twin Cities to help you maintain a safe and beautiful home. Taking care of your asphalt today is the best way to ensure it serves you well for years to come.
Frequently Asked Questions
Is it better to seal or fill driveway cracks?
Filling is the necessary choice for any open gap to prevent water from reaching the gravel subgrade. Sealcoating is a separate, global treatment that shields the entire surface from UV oxidation and oil spills. You should view crack filling as a structural repair and sealcoating as a protective finish. For a complete maintenance strategy, you must always fill the gaps before applying a sealcoat.
What is the best temperature to fix driveway cracks in Minnesota?
The ideal window for asphalt repair is when ambient temperatures are at least 50 degrees Fahrenheit and rising. In the Twin Cities, this typically occurs from late spring through early autumn. If you attempt to fix driveway cracks during colder periods, the material will struggle to bond with the asphalt walls. This leads to the filler pulling away when the pavement contracts in the winter.
How long does driveway crack filler take to dry before I can drive on it?
Most retail cold-fillers require 24 to 48 hours to cure fully before they can support vehicle traffic. Professional hot-pour rubberized fillers set much faster because they harden as they cool, often allowing cars back on the surface within 30 to 60 minutes. High humidity or unexpected rain can significantly extend these drying times, so it's best to check the forecast before starting.
Can I use concrete filler on an asphalt driveway?
You shouldn't use concrete repair products on an asphalt surface. Asphalt is a flexible pavement that expands and contracts significantly, while concrete filler is a rigid material. Because the two materials have different thermal properties, the concrete patch will likely crack or pop out within a single season. Always use rubberized, bitumen-based products specifically engineered for asphalt's flexibility.
Why does my driveway crack filler keep popping out every winter?
This failure is usually caused by trapped moisture or a lack of material elasticity. If the crack wasn't bone-dry during application, the filler couldn't form a strong bond. Additionally, many DIY liquid fillers become brittle when temperatures drop below freezing. As the asphalt moves, the rigid filler is squeezed out of the gap. Professional hot-pour materials stay flexible during deep freezes to prevent this issue.
Can I sealcoat my driveway immediately after filling the cracks?
You need to allow the crack filler to cure completely before applying a sealcoat. Most localized repairs require at least 24 hours of drying time, but some thicker applications may need several days to "off-gas" properly. If you apply sealcoat too soon, the oils in the sealer can react with the filler. This often results in a soft, tacky patch that never hardens correctly.