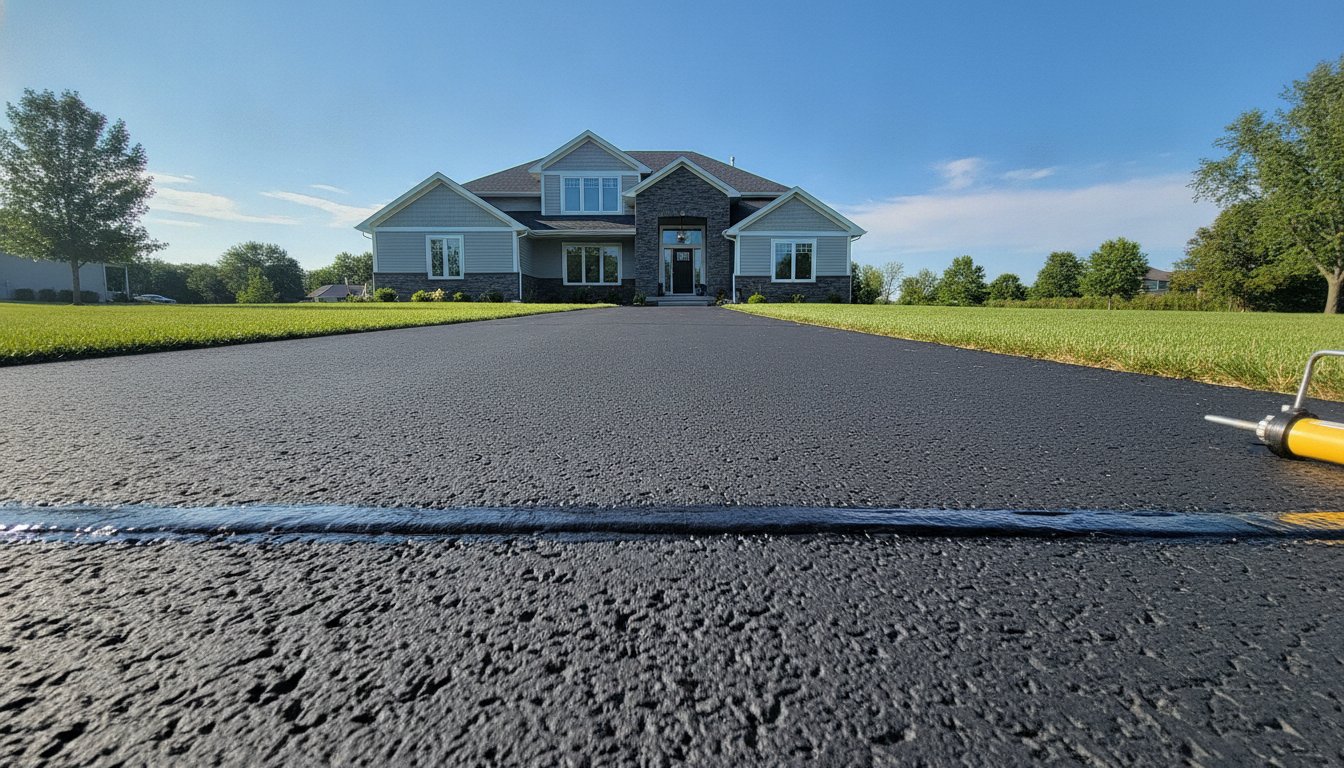
What if the black finish on your driveway is actually doing nothing to stop the cracks forming underneath? Many property owners treat sealcoating as a cosmetic quick fix, but a professional asphalt sealer application is actually a precise act of chemical defense. It's the difference between a surface that survives a brutal Minnesota winter and one that begins to crumble by spring.
We understand the hesitation that comes with pavement maintenance. You don't want to waste money on a product that peels away in twelve months or struggle with the confusion of whether to spray or squeegee. You deserve a driveway that stays structurally sound and looks new for years. This guide teaches you the professional techniques and specific timing required to defend your property against the local climate. We'll cover everything from essential surface preparation to the specific temperature windows needed for a successful cure, ensuring you avoid expensive repaving costs through proactive stewardship.
Key Takeaways
- Understand how a sacrificial coating defends your asphalt's bitumen binder from UV damage and surface degradation.
- Learn why the foundation of a successful asphalt sealer application starts with meticulous deep-cleaning and debris removal.
- Evaluate the specific advantages of manual squeegee versus spray methods to achieve the right texture and thickness for your pavement.
- Identify the "50/50 rule" for Minnesota weather to ensure your maintenance work bonds correctly before the freeze-thaw cycle begins.
- Distinguish between surface drying and chemical curing to properly manage your driveway’s return to service without risking damage.
The Science of Asphalt Sealer Application and Pavement Defense
Your driveway is more than just a flat surface for your vehicle. It's a complex mixture of aggregates held together by a bitumen binder. Think of this binder as the glue that keeps your pavement structurally sound. A professional asphalt sealer application acts as a sacrificial coating designed specifically to protect this "glue" from the elements. Without it, the chemical integrity of your driveway begins to fail the moment it's exposed to the sun and rain.
When you invest in pavement sealing, you aren't just improving the aesthetics of your property. You're engaging in a proactive form of stewardship. Sealcoating prevents water from penetrating the porous surface of the asphalt. In our Minnesota climate, water penetration is the primary cause of base failure. When moisture gets beneath the surface and freezes, it expands with immense force, shattering the pavement from the inside out. A high-quality sealer keeps that moisture on the surface where it belongs.
How Oxidation Destroys Your Driveway
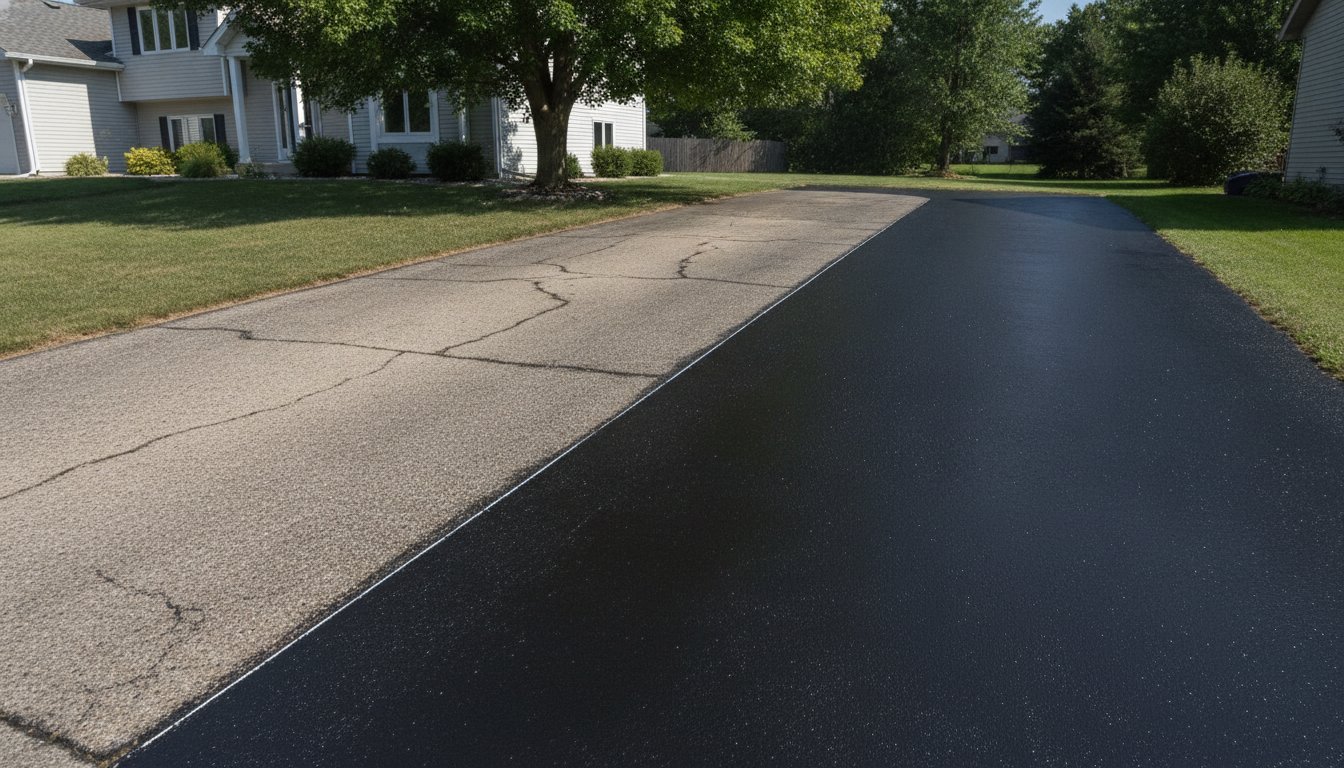
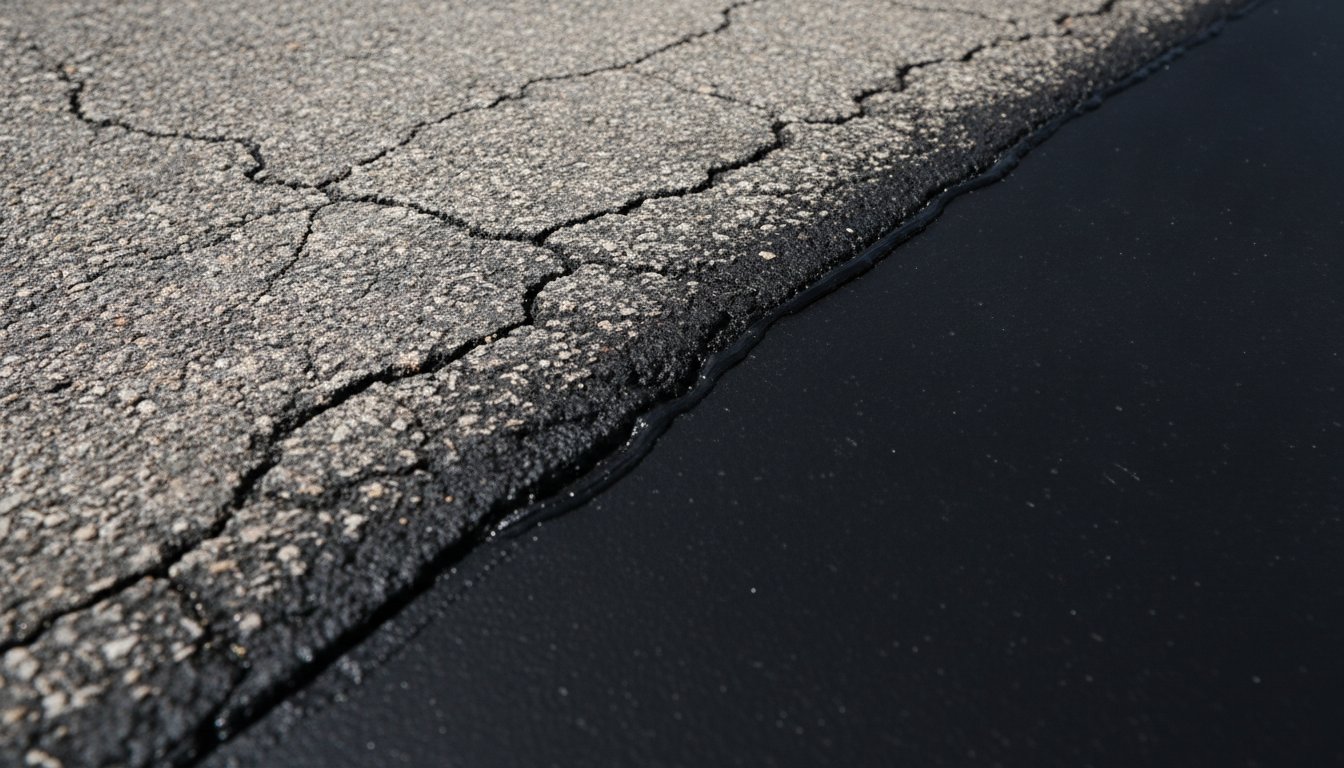
Oxidation is a chemical process that begins as soon as asphalt is laid. UV rays and oxygen strip the essential oils from the bitumen binder, causing it to lose its flexibility. You'll notice this happening when your once-black driveway turns a dull, chalky gray. This isn't just a color change; it's a sign that the asphalt is becoming brittle.
Brittle asphalt cannot handle the weight of vehicles or the shifting of the ground. It starts to "ravel," a process where the small stones in the mix become loose and wash away. By restoring the dark, rich finish through an asphalt sealer application, we're actually replenishing the surface's ability to resist these environmental stressors. It keeps the pavement supple enough to expand and contract without snapping or crumbling under pressure.
The Sacrificial Barrier Concept
Think of sealer like the wax on a high-end vehicle. The wax doesn't make the car stronger, but it takes the brunt of the damage from salt and sun so the paint doesn't have to. Sealer works the same way. It creates a "wear layer" that absorbs the friction of tires and the chemical assault of leaked oil or gasoline.
- Preservation: The sealer wears down over time instead of your expensive asphalt.
- Maintenance Cycle: Because it is a wear layer, it must be reapplied every 2 to 3 years to maintain a full defense.
- Deep Bonding: Professional application ensures the sealer penetrates the pores of the existing pavement for a more durable bond than DIY alternatives.
Choosing to sealcoat is a logical decision based on long-term value. It's much cheaper to replace a thin layer of sealer every few years than it is to pay for a full repaving project because the base was left unprotected. We view every application as a necessary step in defending your property investment against the inevitable decay caused by time and weather.
Essential Preparation: The Foundation of a Successful Bond
Success in any asphalt sealer application isn't determined by the quality of the sealer alone. In fact, approximately 70% of a successful, long-lasting application happens before a single drop of material is poured. If the surface isn't properly prepared, the sealer will simply sit on top of debris or oil, leading to peeling and failure within a single season. We view preparation as the most critical phase of stewardship for your pavement.
Deep Cleaning and Debris Removal
A clean surface is non-negotiable. We recommend using high-pressure air or a professional-grade power washer to achieve edge-to-edge cleanliness. Standard sweeping often leaves behind fine dust and silts that prevent the sealer from biting into the asphalt's pores. Particular attention must be paid to "edge-growth." Grass and weeds creeping over the perimeter must be mechanically removed. If left in place, these roots will trap moisture and cause the sealer to lift at the edges. Once the cleaning is finished, the surface must dry completely. Applying sealer to damp asphalt is a recipe for a weak bond.
Oil and gasoline stains present a unique chemical challenge. Because asphalt and oil are both petroleum-based, oil actually dissolves the bitumen binder. Sealer won't stick to these slick spots without a specialized primer. Skipping this step means the sealer will flake off the oil spot almost immediately, leaving your driveway vulnerable again.
The Critical Role of Crack Filling
One common misconception is that sealcoating will bridge or fix cracks. It won't. Sealcoating is a thin protective layer, not a structural filler. This is why filling cracks in your driveway is an essential prerequisite. By sealing these openings first, you stop water from reaching the sub-base; this is the only way to prevent the ground from shifting and creating even larger fissures during the winter.
- Hot-Applied Fillers: These are used by professionals to provide a flexible, rubberized bond that expands and contracts with Minnesota's temperature swings.
- Cold-Pour Fillers: These are often found in hardware stores. They are easier for DIY use but generally lack the long-term elasticity of hot-applied materials.
- Structural Warnings: Areas with "alligator" or spider-web cracking indicate deep structural failure. These spots often require more than just a simple fill before an asphalt sealer application can be considered.
Taking the time to address these details ensures your investment is protected. While the process is methodical, a professional seal coating service can handle these technical nuances to guarantee a bond that lasts through the harshest seasons.
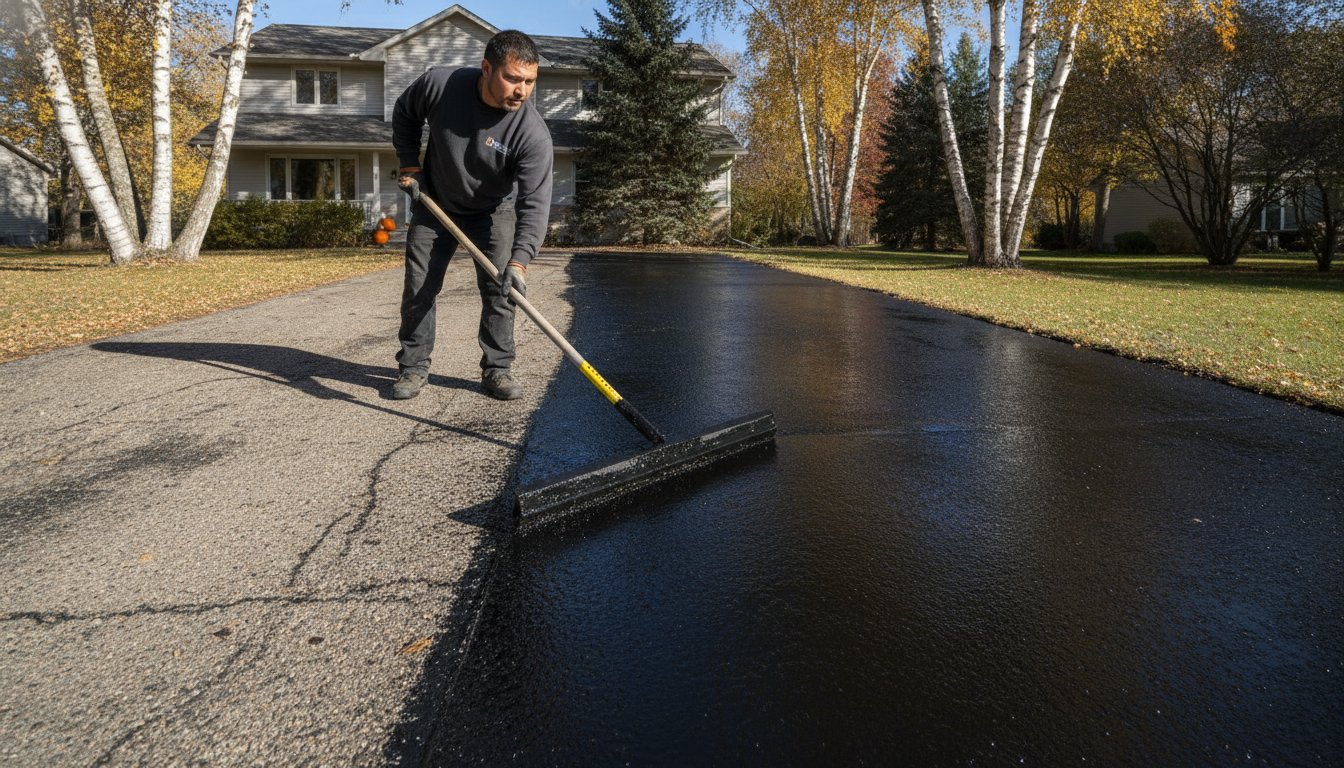
Comparing Application Techniques: Squeegee vs. Spray Methods
Choosing the right method for an asphalt sealer application is just as important as the material itself. While hardware stores sell retail-grade "bucket" sealers designed for a simple brush-on approach, professional-grade emulsions require specific techniques to achieve a long-term bond. The method we choose depends largely on the age and texture of your pavement. It isn't just about speed; it's about ensuring the sealer integrates with the existing aggregate to create a seamless barrier against the elements.
In the industry, we primarily rely on two methods: the manual squeegee and the high-pressure spray. For many property owners, a hybrid approach is actually the gold standard. This involves using a squeegee for the first coat to ensure deep penetration and a spray for the second coat to provide a uniform, aesthetic finish. This dual-layer strategy offers the best of both worlds, providing structural defense and maximum curb appeal.
The Squeegee Method: Deep Penetration
The squeegee technique involves manually pulling the sealer across the pavement using a large, rubber-edged tool. This method is ideal for rough or porous surfaces that have seen several years of wear. Because the material is physically pressed into the surface, the sealer is forced into the small nooks and crannies of the aggregate. This creates a much thicker wear layer than spraying alone.
There are distinct advantages to this approach for weathered driveways. It provides a heavy, textured coat that can help smooth out minor surface irregularities. However, it's labor-intensive and requires a steady hand to avoid leaving visible "brush marks" or ridges. This remains a preferred technique for many sealcoating services in Minnesota, where our older, sun-damaged asphalt often needs that extra material depth to stay protected.
The Spray Method: Uniform Precision
Using high-pressure tips, the spray method atomizes the sealer into a fine mist, allowing for a perfectly even application. This is the preferred choice for newer asphalt or large commercial parking lots where a clean, consistent look is paramount. It's fast and efficient, but it requires professional-grade equipment to maintain the correct pressure and material flow.
- Aesthetics: Provides a smooth, matte finish without the risk of streaks or marks.
- Precision: Allows for a controlled thickness across the entire surface.
- Protection: Professional crews use "over-spray" shields to protect your garage doors, concrete curbs, and landscaping from accidental staining.
While the spray method is excellent for newer surfaces, it doesn't always provide the same level of pore-filling as a squeegee on very old pavement. This is why we evaluate each project individually. We don't just apply a coat of black paint; we select the application method that best serves the long-term health of your specific property.

Timing Your Application for the Minnesota Freeze-Thaw Cycle
In Minnesota, timing isn't just a suggestion. It's the difference between a successful defense and a total failure. The window for a professional asphalt sealer application in the Twin Cities is significantly narrower than in southern states. We strictly follow the "50/50 rule." Both the air and the pavement surface temperature must be at least 50°F and rising for the chemical bond to take hold. If the ground is too cold, the sealer won't cure; it will simply sit on the surface like a film that never truly integrates with the asphalt.
Humidity also dictates the success of your project. A dry, crisp morning in September is often a better environment for sealing than a muggy day in mid-July. High humidity prevents the water in the sealer emulsion from evaporating. This stalls the drying process. If the material stays wet for too long, it remains vulnerable to unexpected rain or tracking from tires. We also warn against the "fall rush." Homeowners often wait until October to protect their driveways. This is risky. If the sealer hasn't had several days of mild weather to harden before the first hard freeze, the moisture inside will expand and cause the coating to flake off immediately.
The Threat of the Freeze-Thaw Cycle
Minnesota is defined by its temperature swings. When water gets trapped under a poorly timed or low-quality sealer, it becomes a structural threat. As that water freezes, it expands. This expansion "pops" the sealer off the aggregate, leaving the bitumen binder exposed to the salt and snow. Professional-grade materials are engineered to remain flexible during these cycles. However, they must be applied during late spring or summer to reach their full strength. A well-timed application provides the elasticity needed to survive the winter without cracking.
Weather Forecasting for Your Project
A successful project requires a 24-hour rain-free window. Even a light mist can wash away uncured material, leading to a messy and expensive cleanup. We also pay close attention to "night-time dew." If fresh sealer is hit by heavy dew before it has dried, it can turn a dull gray or stay tacky. Choosing between sealcoating DIY vs professional often comes down to who can accurately read the local forecast and time the application perfectly. If you want to guarantee your pavement is ready for the frost, it is time to book your seal coating before the window closes for the year.
Post-Application Care: Curing and Long-Term Stewardship
Once the final coat of your asphalt sealer application is complete, the work of preservation continues through patient care. Many property owners mistake a surface that is "dry to the touch" for one that is ready for heavy traffic. It's vital to understand the distinction between drying and curing. Drying occurs when the water in the emulsion evaporates, usually within a few hours under the sun. Curing, however, is the deeper chemical hardening process where the asphalt particles fuse together. This can take several weeks to fully complete, and during this window, the sealer remains slightly susceptible to scuffing.
Think of this period as the final stage of your investment's defense. While you can drive on the surface relatively soon, the chemical bond is still maturing. Treating the pavement with care during these first few days ensures the "wear layer" we discussed earlier remains intact and uniform. Rushing the return to service can lead to cosmetic flaws that are difficult to fix without a full re-application.
The First 48 Hours
Sun exposure is your best friend during the initial drying phase. We generally advise keeping all vehicles off the new surface for a minimum of 24 to 48 hours. If the weather is overcast or particularly humid, err on the side of caution and wait the full 48 hours. One of the most common issues we see is "power steering marks." These occur when a driver turns their wheels while the vehicle is stationary on fresh sealer. This shearing force scuffs the surface and leaves permanent marks. To avoid this, ensure your vehicle is in motion before turning the steering wheel for the first week. You should also keep lawn irrigation systems turned off near the driveway edges for 48 hours to prevent water from streaking the uncured material.
Monitoring Your Investment
A successful asphalt sealer application provides immediate visual evidence of its defensive capabilities. After the first rain following your project, you should see water beading on the surface rather than soaking into the pores. This is the hallmark of a properly sealed driveway. However, this defense isn't permanent. To maintain the structural integrity of your pavement, we recommend a professional re-evaluation every 2 to 3 years. This consistent cycle prevents the bitumen from becoming brittle and failing under the weight of traffic.
For business owners, this proactive approach is a central component of a commercial asphalt maintenance plan. Regular stewardship prevents the need for expensive, disruptive repaving. Whether you are managing a retail parking lot or a residential driveway, the goal is long-term value and structural health. Ready for a professional touch? Contact Seal Team LLC for a free estimate on your asphalt maintenance and let us help you defend your property against the next Minnesota winter.
Defending Your Investment Against the Next Minnesota Winter
Mastering your pavement's health is a continuous act of stewardship. By understanding that a successful asphalt sealer application relies on meticulous preparation and the precise "50/50" timing required for our local climate, you are already ahead of most property owners. You now recognize that choosing the right application method and respecting the chemical curing process are the final, essential steps in preventing the bitumen decay that leads to costly repaving projects. These aren't just cosmetic choices; they're structural necessities for any property in the Twin Cities.
At Seal Team LLC, we specialize in navigating these unique environmental challenges. We utilize professional-grade materials and expert crack filling and sealcoating services to ensure your surface remains resilient against the brutal freeze-thaw cycle. Our team is dedicated to providing the durable, high-quality results your property investment deserves. Don't leave your pavement's defense to chance. Get Your Free Asphalt Maintenance Estimate from Seal Team LLC and take the first step toward long-term preservation. We look forward to helping you keep your property structurally sound and visually impressive for years to come.
Frequently Asked Questions
How long does asphalt sealer take to dry in Minnesota?
Sealer typically takes 4 to 8 hours to become dry to the touch in Minnesota, though full curing requires more time. On a sunny day with low humidity, you might see it dry relatively quickly. However, our local humidity can often extend this window. It is important to remember that "dry" is not the same as "fully cured," which involves a deeper chemical hardening process that takes longer.
Can I apply asphalt sealer if there are rain clouds in the forecast?
You should never proceed with an asphalt sealer application if rain is forecast within 24 hours. Rainwater can wash away the uncured emulsion, leading to a messy cleanup and a failed bond. We monitor local Twin Cities weather closely to ensure a clear window. If even a light mist hits the sealer before it has set, the finish will likely be compromised and require a full rework.
Is one coat of sealer enough, or do I need two?
Two coats are almost always better than one for long-term pavement defense. The first coat acts as the primary bond, filling in the pores of the aggregate. The second coat provides a uniform wear layer that defends against UV rays and traffic friction. While a single coat might look fine initially, it rarely provides the thickness needed to survive several seasons of Minnesota’s freeze-thaw cycles.
What happens if I apply sealer over a dirty or oily driveway?
Sealer applied over dirt or oil will inevitably peel and flake off within a few months. The material needs a clean, porous surface to bite into for a successful asphalt sealer application. Oil spots are particularly problematic because they act as a release agent, preventing a bond. Without deep cleaning and specialized primers for oil stains, your investment will be wasted as the sealer lifts away from the asphalt underneath.
How soon can I drive on my driveway after sealcoating?
You can typically return your driveway to service 24 to 48 hours after the application is finished. We recommend waiting the full 48 hours if the weather is overcast or humid. Even after this window, try to avoid sharp turns or stationary wheel movements for the first week. These actions can scuff the surface while the sealer is still reaching its maximum chemical hardness and durability.
Will sealcoating fill in the potholes on my driveway?
Sealcoating is a protective liquid coating and will not fill in potholes or structural depressions. Potholes indicate a failure in the asphalt base that requires a separate repair process before sealing can occur. Think of sealcoating as a form of stewardship that prevents future damage rather than a fix for existing structural holes. We always recommend addressing these gaps through professional crack filling or repair before beginning a surface application.
Why does my new sealer look streaky or gray in some spots?
Streaks or gray spots often occur due to uneven drying times or moisture interference during the curing process. If one section of your driveway is shaded while another is in direct sun, they will dry at different rates, causing temporary color variations. Night-time dew hitting the sealer before it has set can also cause a chalky, gray appearance. Most minor color inconsistencies will even out as the sealer fully cures over several weeks.
Is it better to spray or squeegee the sealer onto the asphalt?
The best method depends entirely on the current condition of your pavement. A squeegee application is superior for older, porous asphalt because it forces the material deep into the nooks and crannies. Conversely, a spray application is excellent for newer, smoother surfaces where a perfectly uniform aesthetic is the goal. For many Minnesota properties, a hybrid approach using both methods often provides the most durable and attractive result for the owner.