Applying sealer to your driveway a single day too early can turn a protective investment into a messy puddle on your lawn after the first spring rain. It's frustrating to watch your hard-earned money wash away because of a sudden temperature drop or an unexpected drizzle. Most property owners understand that stewardship of their asphalt is vital, yet knowing exactly when to sealcoat driveway surfaces remains one of the most misunderstood parts of home maintenance. You want to defend your property against the elements, but conflicting advice makes it hard to feel confident in your timing.
We're here to provide clarity and professional reassurance. This 2026 guide explains the precise weather conditions required for a successful application and the physical signs that indicate your asphalt is losing its flexibility. You'll learn the "50 and rising" temperature rule, how to spot the graying of oxidation before cracks take hold, and how to build a maintenance schedule that stands up to brutal freeze-thaw cycles. By the end, you'll have a clear roadmap to preserve your driveway's lifespan and its curb appeal for years to come.
Key Takeaways
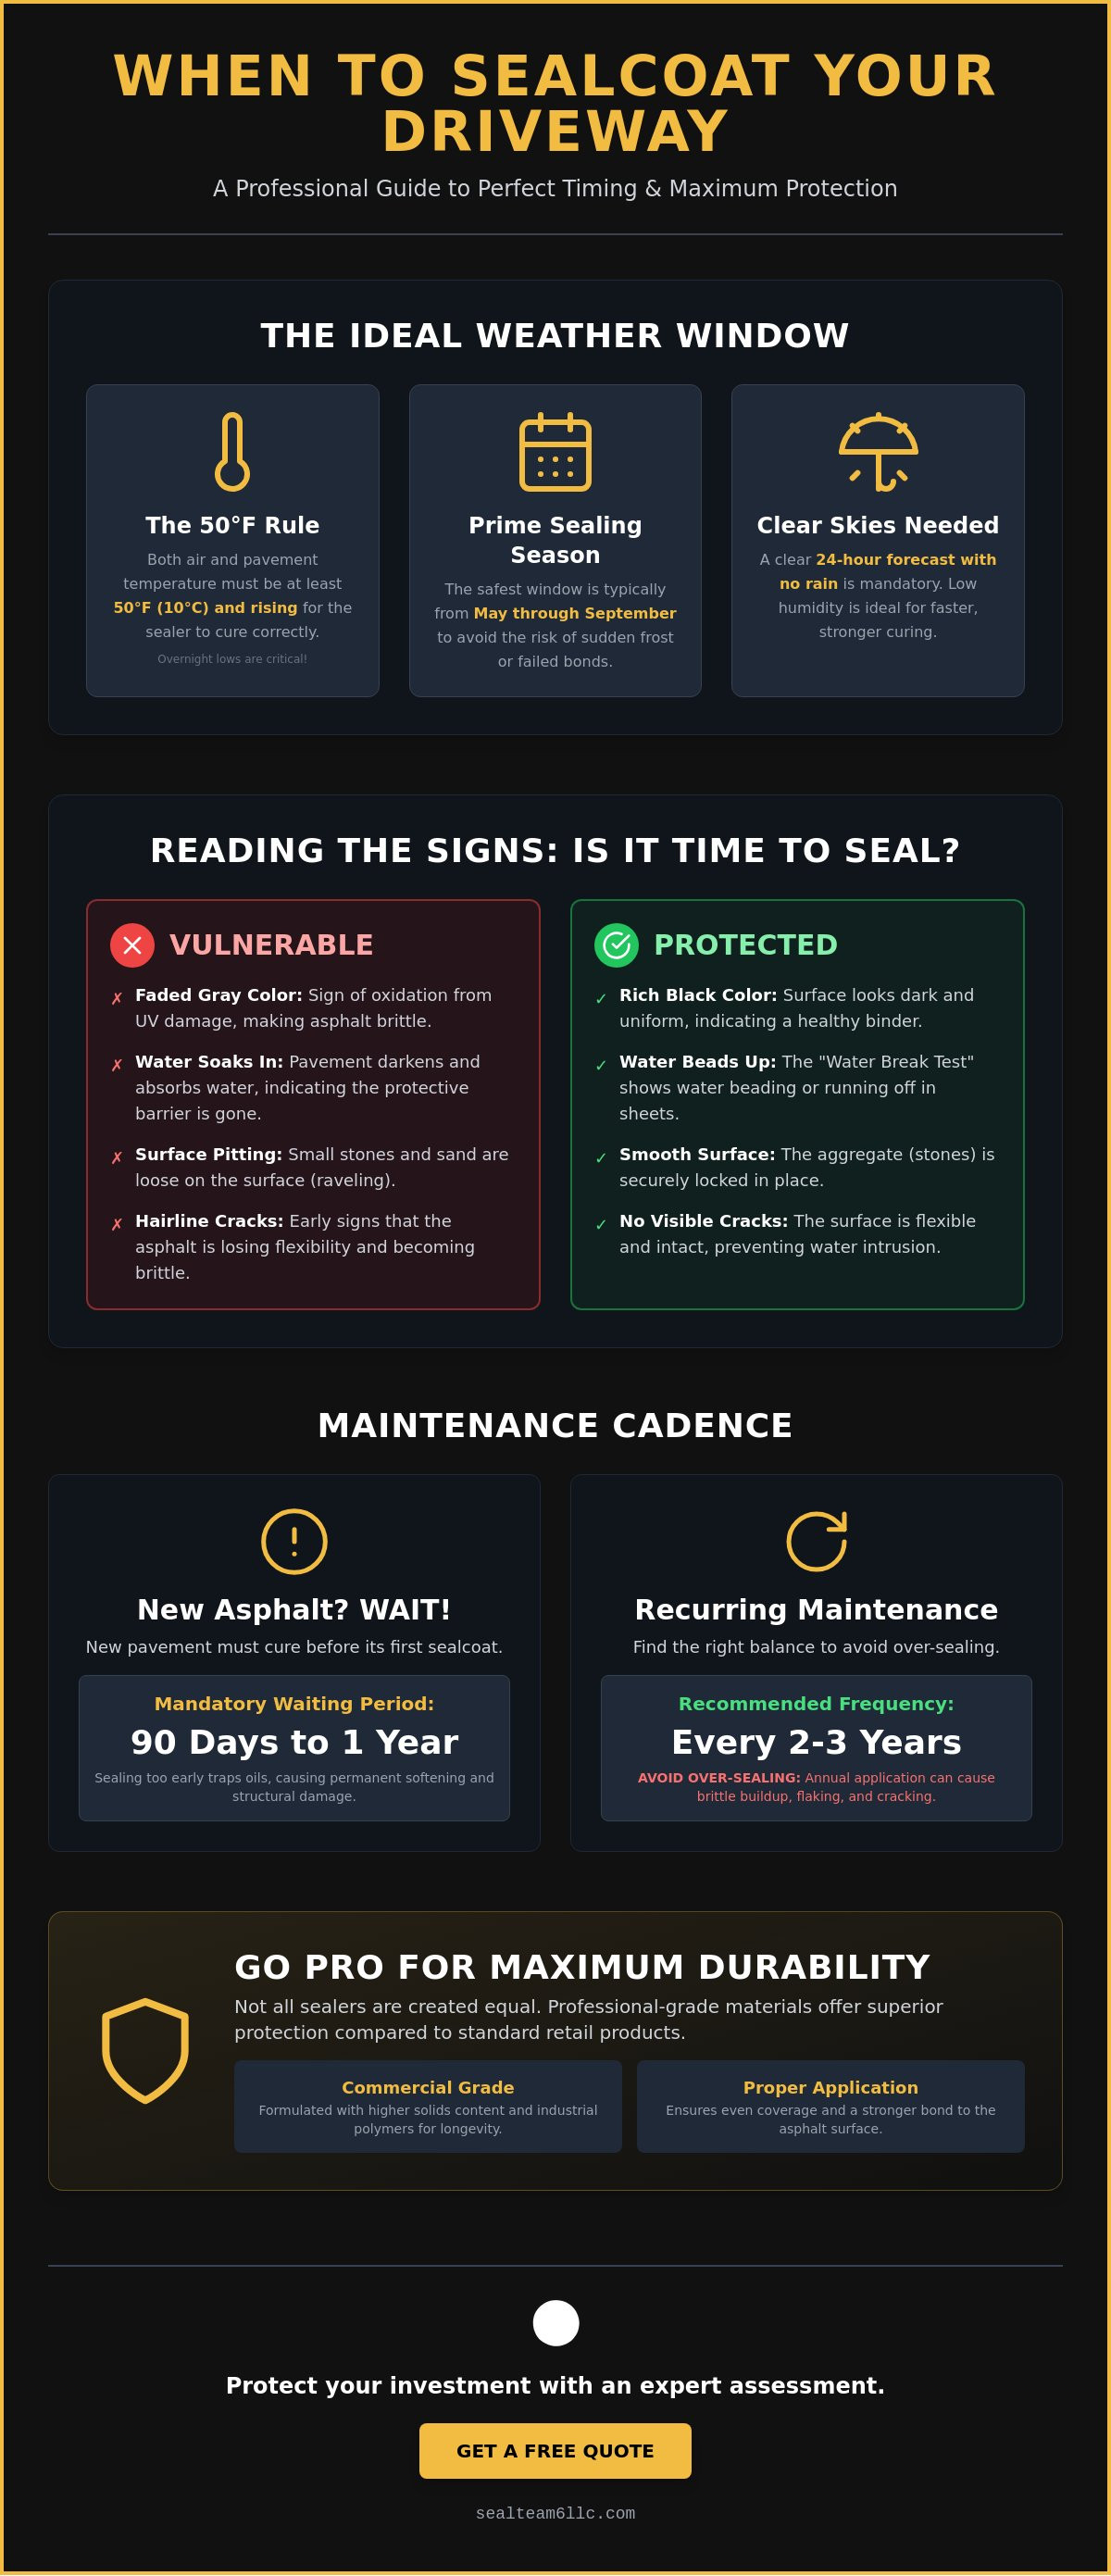
- Learn why overnight temperatures are the critical factor in determining when to sealcoat driveway surfaces to ensure the material cures correctly.
- Identify the specific visual cues, such as "asphalt grey" oxidation and surface pitting, that signal your investment is vulnerable to water damage.
- Understand the mandatory waiting period for new asphalt to prevent trapping oils that can lead to permanent structural softening.
- Discover how to balance maintenance frequency based on traffic and local environment to avoid the brittle build-up caused by over-sealing.
- Recognize the protective differences between commercial-grade emulsions and retail products to maximize your pavement's durability.
The Ideal Weather Window: Temperature and Humidity Requirements
Many homeowners assume a sunny afternoon is the only requirement for maintenance. However, the science of What is sealcoating? reveals that the environment plays a much larger role than just providing a dry surface. Success depends on a specific intersection of temperature, moisture levels, and timing. If you're wondering when to sealcoat driveway pavement, you have to look past the afternoon forecast and check the overnight lows. A beautiful 70-degree day means very little if the thermometer drops to 40 degrees shortly after the crew leaves.
The "Minnesota Window": When is it safe to sealcoat?
In our region, the window of opportunity is narrower than in southern climates. The season typically spans from May through September. While early October can sometimes offer decent days, the risk of a sudden frost is a major deterrent. Applying sealer too late in the fall often results in a failed bond because the material hasn't had enough time to set before the first freeze. To plan your year effectively, following a local asphalt maintenance schedule helps ensure you book your service before the window slams shut and frost becomes a daily threat.
The 50/50 Rule for Temperature
The most critical factor for a durable finish is the 50/50 rule. Both the ambient air temperature and the pavement surface temperature must be at least 50 degrees Fahrenheit and rising for the entire application and initial curing period. Many competitors suggest simply working on a "warm day," but they ignore the danger of the night. If the temperature dips below 50 degrees before the sealer has evaporated its water content, the bond will weaken or fail entirely. The thermal floor for a successful sealcoating project is a consistent 50 degrees Fahrenheit.
Humidity acts as a barrier to progress. Since most modern sealers are water-based emulsions, they rely on evaporation to harden. On a humid day, the air is already saturated. This prevents the water in the sealer from escaping, extending the drying time significantly and leaving the surface vulnerable to tracking. Ideally, you need a 24-hour window without rain. If it pours too soon, the uncured material can wash right off the asphalt and into your landscaping, creating a costly mess.
Sunlight and shade also dictate the application strategy. Direct sunlight accelerates the drying process. This sounds beneficial, but it requires a faster application technique to avoid "lap marks" or an uneven texture. Shaded areas under trees or near the garage take much longer to cure. Professional crews adjust their approach based on these micro-climates on your property to ensure a uniform, protective layer. Knowing when to sealcoat driveway areas involves balancing these environmental variables to achieve a result that stands up to the next five winters.
Physical Signs: Reading Your Driveway’s "Cry for Help"
Your driveway communicates its health through visible changes that many homeowners overlook until the damage becomes structural. Identifying these signals early is the difference between a simple maintenance visit and a full replacement. If you're unsure when to sealcoat driveway pavement, start by observing the texture and color of the surface. Asphalt is designed to be flexible; however, as it ages, it loses the essential oils that allow it to expand and contract with the changing seasons. When those oils vanish, the structure becomes brittle and prone to failure.
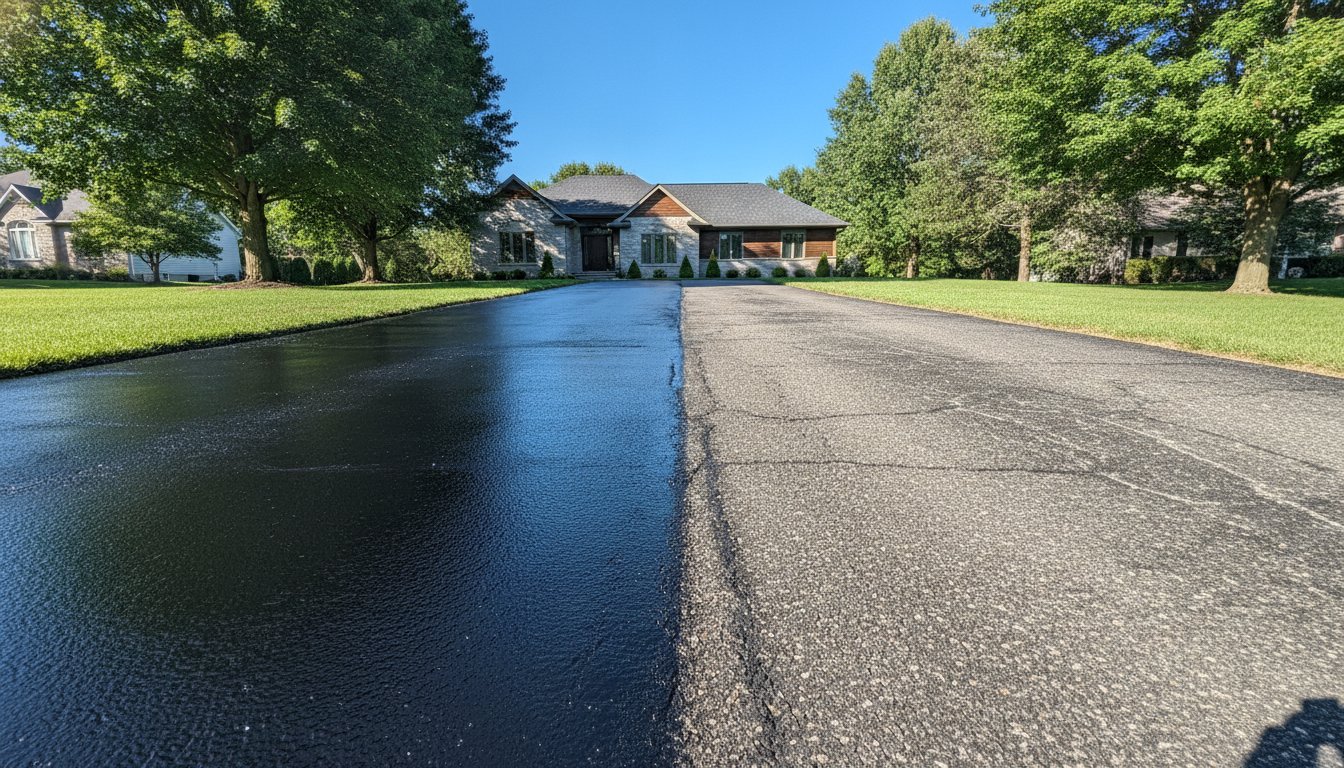
A simple way to check your protection level is the Water Break Test. Pour a bucket of water onto a clean area of the driveway and watch how it reacts. If the water beads up or runs off in sheets, your previous sealer is still doing its job. If the water immediately soaks into the surface and turns the asphalt a dark, damp color, your protective barrier has vanished. This indicates that the subgrade is now vulnerable to moisture penetration, which is a primary cause of structural failure in cold climates.
Oxidation and UV Damage
The transition from a rich, deep black to a dull "asphalt grey" isn't just an aesthetic concern; it's a sign of chemical degradation. UV rays from the sun act like a slow-moving fire, baking out the bitumen binder that holds the stones together. Understanding these asphalt maintenance basics is crucial for long-term stewardship. When the binder becomes brittle, the surface begins to "pit," which is the loss of fine aggregates. You'll notice small piles of loose sand or tiny pebbles collecting at the low points of your driveway. This erosion is a clear sign that the asphalt is falling apart, making it the perfect time to apply asphalt surface treatments to lock everything back in place.
The Danger of Unfilled Cracks
Small, hairline cracks often appear before larger issues take root. These are the entry points for water. In Minnesota, water that enters these cracks will freeze and expand, widening the gap and eventually causing "alligator" cracking, which looks like the scales of a reptile. At this stage, sealcoating alone won't solve the problem. You'll need expert driveway crack filling to stop the cycle of decay. If you've noticed these scale-like patterns or deep fissures, it's best to have a professional from Seal Team LLC evaluate the damage before another winter cycle destroys the subgrade. Proactive care today prevents the massive expense of a full driveway tear-out tomorrow.
Timing for New Pavement: The Curing Period Requirement
Installing a new asphalt driveway is a significant financial investment in your property's value. While it is tempting to apply a protective layer immediately to preserve that rich, deep black finish, doing so too early can actually jeopardize the structural integrity of the pavement. Knowing when to sealcoat driveway surfaces that have just been paved requires an understanding of the chemical stabilization occurring beneath the surface. Fresh hot-mix asphalt needs time to breathe and harden before it can be effectively shielded from the elements.
Unlike older surfaces that need restoration, new asphalt is in a state of chemical transition. The bitumen binder contains light oils that provide the material with its initial flexibility. These oils must evaporate through a process known as off-gassing. If you apply a sealer prematurely, you create an impermeable vapor barrier that traps these oils inside the asphalt mix. This prevents the pavement from reaching its intended hardness, often resulting in a surface that remains soft and prone to "scuffing" or deep ruts from vehicle tires.
The Off-Gassing Process
During the first several months after installation, the new pavement will slowly transition from a flexible state to a rigid one. You can often see this process happening as the "oily" sheen of a brand-new driveway fades into a more matte finish. New asphalt is too flexible for sealer until it has properly cured for at least six months. This timeframe ensures the bitumen has stabilized enough to support a top-coat without the risk of the sealer peeling or the asphalt underneath remaining too pliable to resist power steering marks and heavy loads.
The First Sealcoat Milestone
The first application is perhaps the most critical moment in your driveway's lifecycle because it sets the baseline for all future maintenance. Most residential driveways reach their ideal curing point between 6 and 12 months after the paving crew leaves. To verify if your pavement is ready, perform a modified version of the water test. Pour water on a clean section of the new asphalt. If you see a rainbow-colored oily film on the water, the surface is still off-gassing and is not yet ready for treatment. Once the water remains clear and the asphalt has a uniform appearance, it's time to schedule your service. Understanding what to expect during the first professional application will help you prepare your property for this essential preservation step, ensuring your investment is defended for the long term. This first layer acts as a permanent shield against the UV oxidation and moisture penetration that eventually leads to the "asphalt grey" fading discussed in previous sections.
Maintenance Frequency: Every 1, 2, or 3 Years?
Determining the frequency of your maintenance shouldn't be a guessing game based on the calendar alone. While some contractors might suggest an annual application for "maximum protection," this is often counterproductive. Deciding when to sealcoat driveway surfaces requires a balance between defense and flexibility. Too much sealer is actually a liability. When you apply a fresh layer every single year, the material builds up into a thick, brittle crust that can no longer expand and contract with the asphalt underneath. This leads to "spider-web" cracking or peeling, resembling the surface of a dried-out pond.
For most residential properties in our region, a 2-to-3 year cycle is the ideal sweet spot. This timeframe allows the previous layer to wear down naturally through traffic and weather before a new protective coat is applied. However, commercial lots or driveways with steep inclines may require more frequent attention. High-traffic areas experience faster friction wear, and snowplow blades can scuff away the sealer during a heavy winter. If you see the underlying aggregate stones beginning to show through the black finish, your protection is thinning.
Impact of the Minnesota Freeze-Thaw Cycle
Our local climate presents challenges that national maintenance standards often ignore. The rapid expansion and contraction caused by the freeze-thaw cycle put immense stress on the asphalt binder. While your sealer might still look dark, the ground movement may have opened new hairline fractures. This is why a sealcoating guide for Minnesota emphasizes crack filling as a companion service. Furthermore, the heavy use of road salt on our vehicles can chemically degrade the sealer over time. Rinsing your driveway in the spring to remove salt residue can help extend the life of your current coat.
Customizing Your Schedule
Every property has a different "wear profile" based on its unique environment. A driveway shaded by heavy tree cover will retain moisture longer, which can lead to moss growth and faster sealer degradation. Conversely, a south-facing driveway with full sun exposure will face higher UV oxidation. You should also evaluate your drainage; areas where water puddles will lose their sealer faster than well-sloped sections. By monitoring these specific zones, you can build a sustainable budget that focuses on restoration only when the material truly needs it. If you're ready to establish a professional maintenance plan, you can request a sealcoating estimate to have a specialist evaluate your pavement's specific needs.
Professional Assessment: Moving from "When" to "How"
Once you've mastered the science of timing and identified the physical signs of wear, the focus shifts toward the execution of the work. Deciding when to sealcoat driveway pavement is only half the battle; the quality of the materials and the precision of the application determine whether that protection lasts for three years or fails after three months. Many homeowners are tempted by the convenience of DIY kits found at big-box retailers. However, these retail products are often thin, clay-based fillers that lack the chemical resilience of professional-grade asphalt emulsions. Commercial-grade sealers contain specialized additives and polymers designed to bond deeply with the bitumen, providing a level of defense that retail buckets simply cannot match.
Getting an accurate estimate starts with an honest evaluation of your pavement's current condition. A professional assessment doesn't just look at the color of the asphalt. It involves measuring the depth of existing cracks and checking for "soft spots" that might indicate subgrade issues. This thoroughness ensures the quote you receive covers the necessary restoration steps, such as crack filling, rather than just applying a cosmetic top-coat over structural problems.
The Value of an Expert Eye
A specialist's inspection catches environmental factors that a casual observer might miss. We look for subtle drainage patterns where standing water could undermine a fresh sealcoat. If water pools in a specific corner, the sealer in that area will degrade much faster than the rest of the driveway. Preparation is another area where professional intervention is vital. We utilize high-pressure air cleaning and specialized wire brushing to remove deeply embedded dirt and vegetation from the pores of the asphalt. Without this level of cleaning, the sealer sits on top of the debris rather than bonding to the pavement, leading to premature peeling.
Booking Your 2026 Service
In our region, the demand for high-quality maintenance is concentrated into a few short months. The most reliable contractors typically have their schedules finalized by early June. If you've determined that this is the year when to sealcoat driveway surfaces on your property, it's wise to book your assessment in early spring. This allows you to secure a date during the peak weather window when humidity is low and temperatures are stable. To make the process more efficient, consider the following checklist before the Seal Team LLC crew arrives:
- Turn off automatic sprinklers: Ensure the asphalt and surrounding edges are completely dry for at least 24 hours before your appointment.
- Clear the area: Move all vehicles, trailers, and trash bins off the driveway and away from the edges to provide full access.
- Coordinate with neighbors: Check if anyone else on your block needs service. Group bookings often allow for more efficient scheduling and potential cost savings.
- Manage pets and foot traffic: Plan to keep everyone off the surface for at least 24 to 48 hours to allow the material to cure without marks.
Taking these final steps ensures that your investment in sealcoating provides the maximum possible return. By combining the right timing with professional-grade application, you protect the structural integrity of your asphalt and maintain your home's curb appeal through the most challenging seasons.
Defending Your Investment Against the Seasons
Preserving the lifespan of your asphalt requires a proactive approach based on environmental science rather than guesswork. By adhering to the 50-degree thermal rule and recognizing the early visual cues of UV oxidation, you prevent the structural failures that lead to costly tear-outs. Knowing exactly when to sealcoat driveway surfaces is the first step in a long-term stewardship plan that keeps your property safe and attractive. Each season presents new challenges, but a well-timed application creates a resilient barrier that withstands the elements.
Seal Team LLC specializes in navigating Minnesota’s unique freeze-thaw challenges with commercial-grade materials and expert crack filling techniques. We provide the professional foresight needed to ensure your maintenance is performed at the peak of the 2026 weather window. Don't leave your pavement's durability to chance when expert guidance is readily available. Get Your Free 2026 Sealcoating Estimate from Seal Team LLC and rest easy knowing your investment is protected by local specialists who value durability over quick fixes. We look forward to helping you restore and defend your driveway for years to come.
Frequently Asked Questions
Can I sealcoat my driveway in the spring or should I wait for summer?
You can begin in the spring as soon as the overnight temperatures consistently stay above 50 degrees Fahrenheit. In our region, this window usually opens in late May. While summer provides more predictable heat for curing, spring is an excellent time to repair damage caused by the previous winter's frost. Starting early ensures your asphalt is protected before the heavy summer sun begins to bake out the essential bitumen oils.
What happens if it rains 12 hours after sealcoating my driveway?
Rain within 12 hours can be problematic if the humidity was high during the application. If the sealer hasn't had enough time to evaporate its water content, the rain might wash away the top layer or cause "pockmarks" on the surface. We always monitor the forecast to find a 24 hour clear window, ensuring the material has bonded deeply enough to resist moisture. If a sudden storm hits, the surface should be inspected for any thinning or graying spots.
How long do I need to stay off my driveway after it has been sealed?
You should wait at least 24 hours before walking on the surface and 48 hours before driving on it. While the material may feel dry to the touch within a few hours, it remains soft underneath for a full two days. Driving too early, especially with heavy vehicles or by turning your steering wheel while stationary, can leave permanent scuff marks or ruts in the fresh finish. Shaded areas under trees may require even more time to reach full hardness.
Is it possible to sealcoat a driveway that is already full of cracks?
Yes, but you must prioritize crack filling before the sealer is applied. Sealcoating is a protective film designed to shield the surface; it is not a structural repair material. If you apply it over open cracks, water will still reach the subgrade and cause the pavement to heave during the next freeze-thaw cycle. Filling these gaps first creates a watertight seal that allows the top-coat to perform its job effectively.
Does sealcoating make a driveway slippery when it is wet or icy?
Professional applications remain safe because we include a silica sand additive in our mix. This sand provides the necessary texture and friction for foot traffic and vehicle tires. DIY products from big-box stores often lack this aggregate, which can result in a dangerously smooth surface when wet. Using the correct ratio of sand ensures your driveway stays slip-resistant even during a rainy afternoon or a light frost.
Why does my new sealcoat look streaky or uneven during the first week?
Streaking is a natural part of the curing process caused by varying drying rates across the asphalt. Areas in direct sunlight will darken and harden faster than sections in the shade. Additionally, different parts of your driveway may be more porous, absorbing the material at different rates. This uneven appearance is temporary; the color will typically reach a uniform, deep black finish after a few days of consistent UV exposure and air circulation.
How much does professional sealcoating cost compared to doing it myself?
Professional service carries a higher initial cost but offers better long-term value due to the grade of materials used. Commercial-grade emulsions are significantly more durable than the clay-based fillers found in retail kits. When you consider the labor, equipment rental, and the fact that a professional job lasts years longer, the annual cost of professional care is often lower. It's a sensible investment for those who value their time and the longevity of their pavement.
Can I apply sealcoat over oil stains or do they need to be treated first?
Oil and gasoline stains must be scrubbed and treated with a specialized primer before we begin. Since sealer is a water-based emulsion, it will not bond to petroleum-based spots. If you skip this step, the new coating will simply peel away from the oil-soaked areas within weeks. Treating these spots ensures a uniform bond and prevents the chemicals from continuing to eat through the asphalt binder underneath the new layer.